In this article, I’d like to explain how I built the MVP of Kassette (in case you’ve missed it, there is the first article). But before diving into the story, we need to cover one small detail: what an emulator actually is.
Nerd Context - feel free to skip this Link to heading
The next few sections get a little technical. You do not need to understand all of this to follow the rest of the article, so feel free to skip ahead if buses, memory addresses, and CPU instructions are not your idea of a good time.
How does a CPU work Link to heading
CPUs communicate with other components through a bus: a group of electrical connections that carries addresses, data, and control signals around the system. Some addresses point to memory, while others connect to hardware such as graphics chips, storage controllers, or input devices.
From the CPU’s point of view, communicating with them mostly means reading from or writing to the right address.
What is an emulator? Link to heading
According to Wikipedia:
An emulator is hardware or software that enables one computer system (host) to behave like another computer system (guest).
In our case, the host is the computer running Kassette, and the guest is the NES. More specifically, we want our program to understand the instructions used by the NES CPU and reproduce what the original hardware would have done.
That might sound intimidating. You may imagine having to learn everything about x86-64 or ARM, everything about the 6502, and then painstakingly translate one instruction set into the other. At least, that’s what I imagined. 🤦🏻♂️
Thankfully, that is not how it works.
For a simple emulator, we can read each NES instruction and reproduce its behaviour using ordinary Kotlin code. Old consoles are slow enough by modern standards that we can get away with this surprisingly direct approach (even Python can be fast enough 😉).
You don’t have to take my word for it, though. Imagine we want the 6502 to load two numbers from memory, add them together, and store the result somewhere else:
LDA $10 ; Load the value at address $10 into register A
ADC $11 ; Add the value at address $11 to register A
STA $12 ; Store the result at address $12
A heavily simplified Kotlin version could look like this:
class Cpu6502 {

    val ram = ByteArray(2048)

    // CPU's Internal Register A
    private var a = 0

    fun write(address: Int, value: Int) {
        ram[address] = value.toByte()
    }

    fun read(address: Int): Int {
        return ram[address].toInt() and 0xFF
    }

    fun execute(opcode: Int, address: Int) {
        when (opcode) {
            // LDA
            0xA5 -> a = read(address)
            // ADC
            0x65 -> a = (a + read(address)) and 0xFF
            // STA
            0x85 -> write(address, a)
            // ...
        }
    }
}

fun main() {
    val cpu = Cpu6502()

    cpu.write(0x10, 20)
    cpu.write(0x11, 22)

    cpu.execute(0xA5, 0x10) // LDA $10
    cpu.execute(0x65, 0x11) // ADC $11
    cpu.execute(0x85, 0x12) // STA $12

    println(cpu.read(0x12)) // 20 + 22 = 42
}
This leaves out plenty of details, but that is not the point of the example. The important part is the basic pattern: read an instruction, work out what it is supposed to do, and reproduce that behaviour in any high-level language.
The NES architecture Link to heading
Here is a simplified diagram of the NES architecture:
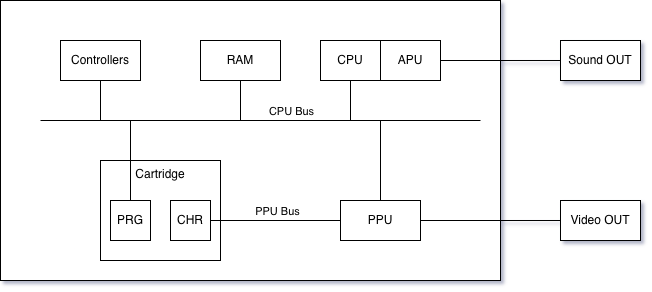
The console is built from a handful of main components:
- CPU: A Ricoh processor based on the 6502. It executes the game’s code.
- RAM: 2 KB of working memory used by the CPU.
- APU: The Audio Processing Unit, built into the same chip as the CPU.
- PPU: The Picture Processing Unit, the NES equivalent of a very early GPU.
- Controllers: The player-input devices.
- Cartridge: Contains the game data:
- PRG: The program data containing the game’s code.
- CHR: The graphics data used to draw backgrounds and sprites.
The NES has two main buses: the CPU bus and the PPU bus.
The CPU bus connects the CPU to RAM, the PPU registers, the controllers, the APU, and the program data inside the cartridge. Meanwhile, the PPU has its own bus, which it uses to fetch graphics data while drawing the image on the screen.
This separation is important. The PPU can read the graphics it needs without asking the CPU to copy every pixel individually, which is useful when your entire machine is running at roughly the speed of a modern loading spinner.
The simplest cartridges mostly contain program and graphics data. More advanced games also include a mapper (not represented in the diagram): a piece of hardware that works around the console’s limitations. Mappers can switch between different sections of the cartridge, provide extra memory, generate interrupts, and sometimes even add new sound capabilities.
In other words, the cartridge is not merely a storage device. It can also become an extension of the console itself.
Defining the MVP Link to heading
When defining an MVP in my day-to-day job, I tend to follow one simple rule:
If I’m completely happy with it, I’ve probably built too much.
With that in mind, I came up with the following requirements—or, perhaps more accurately, non-requirements:
- It only needed to run Super Mario Bros.
- It only needed to work on desktop, no web or mobile support.
- It did not need sound.
- It did need graphical output.
- The keyboard would act as the controller, no USB gamepads.
At that point, I felt there was nothing else I could remove without turning the MVP into a blank window and a dream.
I started a conversation with ChatGPT, and after a few messages back and forth, those product requirements became something closer to a technical specification:
- The emulator would run on the Java Virtual Machine.
- The CPU would implement all 151 official 6502 opcodes (Yes, the CPU has some unofficial opcodes to perform some special operations. Cheeky Nintendo!).
- It would support Mapper 0, the mapper used by Super Mario Bros.
- It would load ROMs in the iNES 1.0 format.
- It would emulate the NTSC version of the console, since PAL systems have slightly different timings and specifications.
- Rendering would use OpenGL through LWJGL.
- The ROM would be selected through a command-line argument.
- There would be no user interface beyond the OpenGL window.
I then asked ChatGPT to turn these requirements into a prompt for Codex. I created a new Kotlin project, launched Codex, pasted in the specification, and hit Run.
A few minutes later, a window appeared showing a suspicious collection of blue and brown pixels: it was the title screen of *Super Mario Bros! *That was already extremely exciting!
The game was not playable yet, though. I sent Codex a screenshot, gave it one more prompt, and the next version was playable.
Two prompts. One plumber. Zero sound. Nailed it!
Opening the Pandora Box Link to heading
As a kid, I always wanted to know how things worked, so I took everything apart. Putting it back together was usually a different story.
More than 30 years later, not much has changed. That is probably why I became a software engineer: I can still take things apart to see how they work, but when I break them, I can usually fix them.
But I digress. The point is, I did not even finish the first level. I closed the game, went back to the IDE, and started digging through the code.
Here is what I found.
Most of the heavy lifting was done Link to heading
Implementing a single CPU instruction is fairly simple. Implementing all 151 official instructions is a different story, especially when some of them come with enough edge cases to ruin an otherwise perfectly good afternoon.
Still, once I inspected the CPU implementation, most of that work had already been done. To check it, I downloaded a few test ROMs designed to verify whether an emulator handles the instructions correctly. Aside from a couple of failures, the results were surprisingly good.
The other notable challenge was rendering the video output with OpenGL. Again, none of this is rocket science, but OpenGL has a way of making even a simple task, such as drawing pixels to a window, take several hours when you are not familiar with it.
Architectural flaws Link to heading
Component dependencies Link to heading
One reason object-oriented programming became so popular is that it lets us model software in terms of things and the relationships between them. That only works, however, if those relationships reflect what we are actually trying to represent.
As explained earlier, a cartridge contains:
- PRG memory, accessible by the CPU;
- CHR memory, accessible by the PPU;
- a mapper;
However, this was the generated implementation:
class Mapper0(private val cartridge: Cartridge) : Mapper {
    override fun cpuRead(address: Int): Int {
        if (address < 0x8000) return 0
        return cartridge.prg[address and prgMask].toUnsignedInt()
    }

    override fun cpuWrite(address: Int, value: Int) = Unit

    override fun ppuRead(address: Int): Int = cartridge.chr[address and 0x1FFF].toUnsignedInt()

    override fun ppuWrite(address: Int, value: Int) {
        if (cartridge.isChrRam) cartridge.chr[address and 0x1FFF] = value.toByte()
    }
}
There is something backwards here: the cartridge contains the mapper, yet the mapper depends on the entire cartridge.
That dependency is much broader than necessary. Mapper 0 only needs access to the PRG memory, the CHR memory, and the information that tells it whether CHR is writable.
A cleaner representation would therefore look like this:
class Mapper0(
    private val prg: ByteArray,
    private val chr: ByteArray,
    private val isChrRam: Boolean,
) : Mapper {

    override fun cpuRead(address: Int): Int {
        if (address < 0x8000) return 0
        return prg[address and prgMask].toUnsignedInt()
    }

    override fun cpuWrite(address: Int, value: Int) = Unit

    override fun ppuRead(address: Int): Int = chr[address and 0x1FFF].toUnsignedInt()

    override fun ppuWrite(address: Int, value: Int) {
        if (isChrRam) chr[address and 0x1FFF] = value.toByte()
    }

}
Now the dependency points in the right direction: the cartridge owns the mapper and gives it access only to the memory it needs.
This also suggests a cleaner boundary for the rest of the emulator. The CPU bus and PPU should communicate with the cartridge, while the cartridge delegates those reads and writes to its mapper internally. That way, the rest of the console does not need to know how the cartridge is organised.
The generated version instead exposed the mapper throughout the architecture:
- the CPU bus accessed the mapper directly;
- the PPU accessed the mapper directly;
- other components began depending on cartridge internals.
Individually, these choices may look harmless. Together, they weaken the boundaries between components and make the code harder to change.
Once you notice a problem like this, fixing it is usually straightforward. The danger is missing it and continuing to build on top of it, because by the time you finally realise what happened, the spaghetti code will already be cold. And, as an Italian, I find that particularly upsetting.
Property or Constructor? Link to heading
While reviewing the code, I found another architectural decision similar to the previous one:
class NesMachine(
    // Constructor param
    private val cartridge: Cartridge
)
This means that a cartridge is required to create the emulator. Once the console exists, the game cannot be changed without throwing the entire machine away and creating a new one.
That satisfies the original requirement to launch one ROM from the command line, but it does not model the real relationship particularly well. A cartridge belongs inside the console, but it is not a permanent part of it.
A better representation might be:
class NesMachine {
    // Optional property
    var cartridge: Cartridge? = null

}
This tiny change introduces several behaviours almost for free:
- A cartridge can be inserted and removed at runtime.
- The console can exist without a game inserted: mostly useless, but accurate.
It also raises some interesting questions:
- How should the other components behave when no cartridge is present?
- What happens if someone ejects it while the game is running?
To be clear, this was not the LLM’s fault. I had explicitly asked for an application that loaded a ROM from the command line, and the generated design satisfied that requirement.
The problem is that details like this rarely appear in a high-level specification. When we write code ourselves, we continuously discover and resolve these tiny hidden requirements without necessarily noticing that we are doing it.
I would probably never have made the cartridge a mandatory constructor argument. I would have looked at it, thought “That thing is removable”, and modelled insertion and removal as part of the console’s behaviour.
Nitpicks (?) Link to heading
Considering that the entire project came from only two prompts, I found a surprising amount of unused and duplicated code.
Unused code was easy enough to catch because the IDE pointed it out. Duplication was harder to spot, especially with more than 3,000 generated lines waiting to be reviewed.
Elsewhere, I found little works of art like this:
private fun absy(page: Boolean): Addr { val b=abs(); val a=(b+y) and 0xFFFF; return Addr(a, if (page && (b and 0xFF00)!=(a and 0xFF00)) 1 else 0) }
Technically, it works. But it feels like being mugged by a single line of Kotlin.
I had already introduced utility functions to make expressions such as and 0xFFFF easier to understand, but the
repeated Addr allocations were the more interesting problem.
Imagine this: you are fighting the final boss in Ghosts ’n Goblins and you have one life left.
During the game, the emulator has executed thousands or perhaps millions of absolute-Y addressing operations, creating a
fresh Addr object each time.
Then, just as you are about to land the final hit, the JVM decides that this is the perfect moment to collect some garbage.
The game stutters. You die. GAME OVER.
In a commercial game, enough issues like this could be the difference between a smooth experience and a product players abandon.
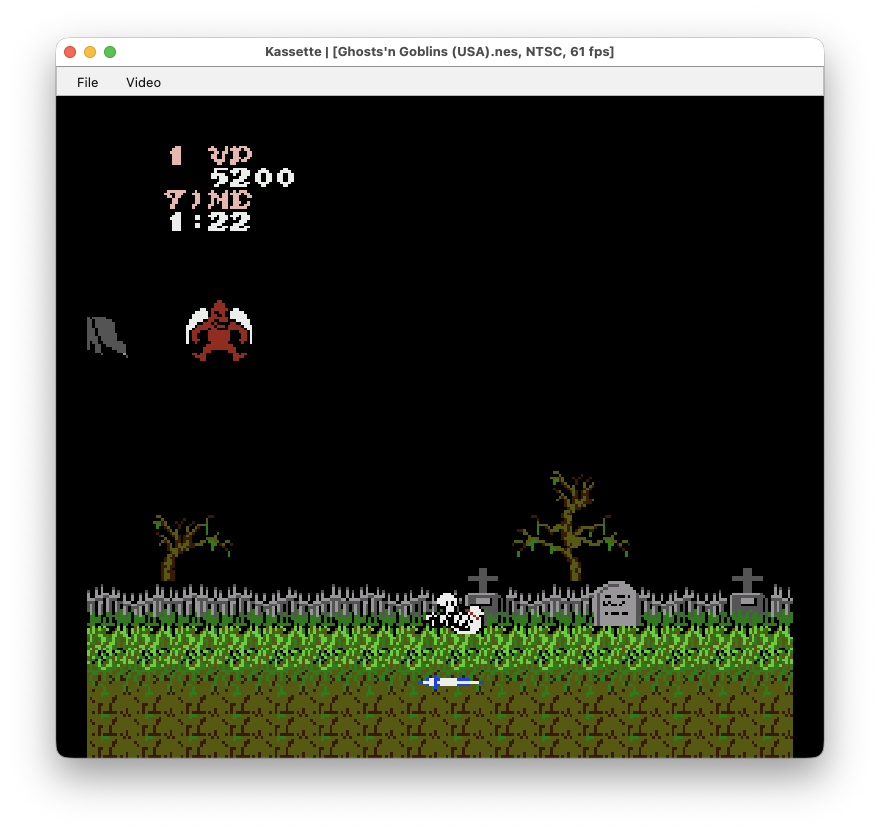
Most common screen you’ll see playing Ghosts ‘N Goblins
Final Considerations Link to heading
Congratulations: you made it to the end! Unlike me, you did not abandon everything halfway through.
I had tried to write an emulator several times before, but I had never got very far. Implementing an entire CPU requires enough repetitive work that the interesting part can remain permanently hidden behind a wall of opcodes.
This time, an LLM demolished that wall in a few minutes. It gave me a playable version of Super Mario Bros.
That was both impressive and, as I discovered shortly afterwards, part of the problem.
The generated code satisfied the requirements I had provided, but it also contained architectural shortcuts, unnecessary dependencies, duplicated code, avoidable allocations, and decisions that made sense only within the narrow scope of the original prompt.
None of this makes the experiment a failure. Quite the opposite: without the LLM, I probably would not have reached the interesting problems at all. Instead of spending days implementing CPU instructions, I could immediately start exploring how an emulator fits together, questioning its design, and improving it.
In hindsight, I should have defined the overall architecture before asking the LLM to generate the implementation. Clear component boundaries, responsibilities, and dependencies would have produced better code and given the model a more consistent context for each subsequent change.
The biggest lesson was that speed does not remove the need for software engineering. Therefore, the same good old principles still apply:
- Understand the problem before opening the IDE.
- Reduce scope, not the quality.
- Keep changes small enough that you can understand their consequences.
- Carefully read the code the LLMs generate.
An LLM can save you from writing thousands of lines by hand but it cannot save you from understanding how those lines fit together.
In the next post I’ll articulate how I started testing the architecture by adding Sound, Controllers an more features to Kassette.
Enjoy!
- Source code: GitHub
- Play online: WebAssembly emulator
Thanks for reading Orfeo’s Substack! Subscribe for free to receive new posts and support my work.